This post contains affiliate links, which means I may earn some money if you click on one. Don't worry, there is no additional cost to you. Thank you for supporting my blog.
I finally bought some authentic Korean pepper flakes to make kimchi. It’s an overcast day, and my daughter is napping, so it’s a good time to try it out. (With the flu going around again, the timing is perfect).
Health Benefits of Kimchi
Kimchi is loaded with beneficial bacteria which can strengthen your immune system. It is a great food to consume regularly to make sure the population of “good bacteria”, (probiotics), outnumber the pathogenic bacteria and viruses in your body. It is also loaded with digestive enzymes, so it can prevent bloating and heartburn too.
It also happens to be DELICIOUS!! Though I must admit, for me it was an acquired taste. It did take me some time to get used to it. Now I love it. I eat it every day.
Chinese Cabbage vs. Other Varieties of Cabbage
I have tried using green cabbage to make kimchi and sauerkraut. I prefer to purchase local organic vegetables, and Chinese cabbage is not available at the local organic farm stores. I found Chinese cabbage at the local grocery store in town, but it is not organic. Fortunately, cabbage is one of the “clean 15” , which means cabbage does not contain high levels of pesticides.
Also, scientific studies show that microbes in kimchi degrade pesticides. So this is yet another reason to ferment cabbage.
I definitely recommend using Chinese cabbage to make kimchi. Today I expected to have to “massage” the cabbage for at least 10 minutes, to get just a little bit of brine. Instead, the brine formed after a few minutes of squeezing the cabbage. Chinese cabbage is SO much easier to work with.
Korean Pepper Flakes
They are hard to find, but I highly recommend using the Korean red pepper flakes to make kimchi. The Korean pepper flakes are called Gochugaru (고추가루). In a pinch, I have tried using other pepper flakes and it is not the same. Someday I want to grow the Korean Peppers, dehydrate them, and turn them into powder. Maybe I will, if I start making kimchi regularly. In Korea I used to see people dehydrating peppers out in the sun, on black tarp. It was pretty interesting to see.
There are actually many different types of kimchi. Over the next few months I hope to make many different types. However, today I just used what I had in the fridge. The Napa cabbage was too small to make a full batch of kimchi, and I didn’t have all the ingredients to make the “water kimchi” with the Daikon radish. So, I just mixed them together and made my own version.
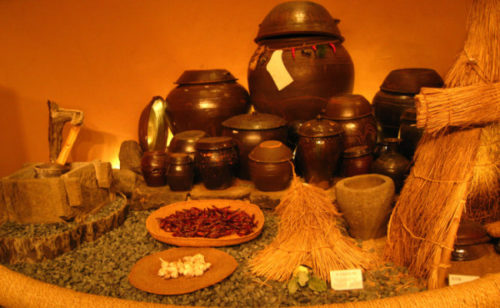
Equipment
I actually have an authentic kimchi pot, but I usually ferment in small mason jars. I use these lids I bought on Amazon. I have made kimchi and sauerkraut without special lids. It works fine as long as the veggies stay under the brine. (I use a few glass weights to keep the cabbage submerged). However, I have found that the lids help to prevent mold. If mold forms, supposedly anything under the brine is supposed to be O.K. to eat, (people refer to it as a “bloom”). I am a visual person, so if I see mold I throw it out. So that is the main reason I use the lids.
Let it ferment for about a week, then move it to the fridge. The taste actually improves with age.

Tips – Use sea salt, do NOT use regular table salt. It’s not the same. Sea salt has minerals that will help in the fermentation process.
Starters – Some people use vegetable starter cultures. So far I have not needed them. I will often save some sauerkraut or kimchi juice and add a little bit, but not always. Some people swear by them, they claim it helps them obtain consistent results. (I am sure that is true, it makes sense biologically). If it makes you feel better, that is another option.
I used to wonder how I would know if I had a bad ferment. One day it happened with a batch of pickles. They were rotten, it was obvious. They smelled awful!! (The weight was not heavy enough and they did not stay under the brine. It was gross). So make sure the veggies stay under the brine, and when in doubt throw it out. It might help to start with a shorter ferment and work your way up. That is what I did.
If you make kimchi, it let me know how it turned out! I tend to make it a little mild, so my kids will eat it. I think I might start making some spicier versions for me.

Kimchi
Ingredients
- Recipe
- 1 small Napa Cabbage
- 1/2 small Daikon Radish
- 1/2 cup shredded carrots
- handful of green onions
- 1 inch of ginger root (peeled and grated)
- 4 cloves of garlic (peeled and grated)
- 1 TBS Celtic Sea Salt
- 1/4 cup sauerkraut/kimchi juice (optional)
- 1 tsp of Korean red pepper flakes
Instructions
1. Sterilize your equipment and wash your veggies. (I use boiling water for the equipment, and a vinegar/water mix for the veggies. Sometimes, I time it so the bowl, knife, and mason jar come straight out of the dishwasher).
2. Shred your Napa cabbage in a large bowl. I do this first and add the 2 TBS of salt so the brine can form while I prepare the other vegetables. (I used to use a food processor, but I don't anymore. When I use a food processor the cabbage shreds into very small pieces. This becomes a problem later on during the fermentation process because pieces float up into the brine, and I don't like that. Now I shred the cabbage by hand, and I use kitchen shears to cut the thicker pieces.) Set aside two cabbage leaves for later.
3. Peel and shred the carrots. Add the 1/2 cup to the bowl.
4. Peel the ginger root and garlic. Shred and add to the bowl. (I just throw them into my magic bullet to mince it. It is a lot faster than doing it by hand).
5. Slice the green onions into small slices and add them to the bowl.
6. Peel the Daikon radish and cut it into small cubes. Then add it to the bowl.
7. At this point the brine has probably already started to form. If not that is alright, you can make it now. You do this by squeezing the shredded cabbage. The salt will draw water out of the vegetables. Keep mixing until you have a fair amount of brine, (you will need enough to cover the vegetable mixture in the mason jar).
8. Add the 1 tsp of hot pepper flakes. (You can use regular chili flakes too, it just won't be as spicy).
9. Place the vegetable mixture into a mason jar, one handful at a time. Push down hard each time, you want to cover the veggies with brine. (Make sure you leave some room at the top of the jar).
10. Take one of the cabbage leaves and fold it in half and push down on the cabbage mixture. Push down hard, try to get as much air squeezed out of the shredded veggies as you can. You want to have around an inch of brine on top of the jar, covering the vegetables. This is VERY important. (The vegetables that stay submerged under the brine will ferment properly, and are preserved by the lactic acid produced by the lactobacteria from the cabbage leaves. If the vegetables do not stay submerged under the brine they will spoil).
11. Place a weight on top of the cabbage leaf. You can use a sterilized stone, a smaller jar, etc. (I have used a smaller jar filled with marbles before. Now I use a few glass weights I bought on Amazon).

No Comments