This post contains affiliate links, which means I may earn some money if you click on one. Don't worry, there is no additional cost to you. Thank you for supporting my blog.
One of the disadvantages to having my garden plot at the community garden is the limited irrigation options. There are 2 large rain water storage tanks, which is where the gardeners draw their water from. It is not as easy as using a hose. My daughter and I water our garden by filling up 5 gallon buckets of water, and using a wheelbarrow to transport them from the storage tanks to our garden.
In the beginning of the season it is not a big deal because the plants are still small and do not require a substantial amount of water. As the season progresses; the plants need more water, (because they are larger), so this process becomes more challenging.
Someday, when I have a more permanent garden, I plan on setting up a drip system irrigation system. Once it is set up, my square foot garden will require very little maintenance. I truly look forward to that day because I will easily be able to maintain a very large garden. But for now, it is what it is.
Convenience is not the only reason to have some sort of self watering system set up. Many plants do better if they have consistent watering, and an inexperienced gardener such as myself can definitely run into problems. Especially since I have to rely on others to water my garden if I am out of town for a long weekend in the middle of July or August. I did some research last year to find some sort of system or device to help me out with this problem as well.
One solution I found for tomatoes involves using a 5 gallon bucket as a self-watering system for tomatoes.
It looked pretty interesting, and people said they got great yields using this method. However, my garden was already set up when I read about this, and I did not think this method would work very well with my “Square Foot Garden” layout. I was also not thrilled about using a plastic bucket because of the potential for leaching out chemicals. (I know I use a plastic bucket to water the plants, but it is not sitting in the sun with water in it for long periods of time). It might not be a problem if I buy a good quality bucket, but I just was not sure.
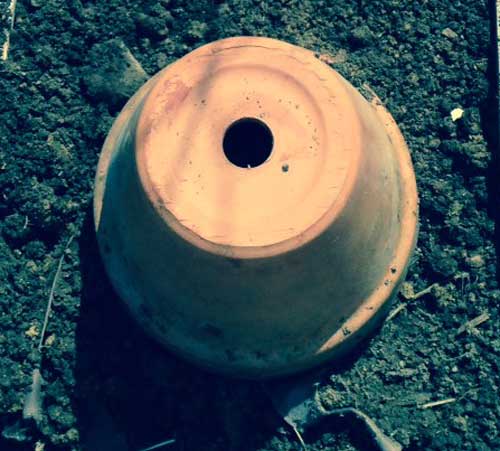
Then I learned about Ollas. Ollas are clay pots that are buried in the ground. The top/neck of the olla remains above the ground.The pots are permeable to water, which means after you fill them with water, it can slowly flow from inside the pot to the surrounding soil. It is a natural way to keep the soil moist.
There are ollas available for purchase on amazon, but I was looking for a less expensive solution. (Plus I would have to dig a pretty deep holes to accommodate the ollas I saw).
Then I found instructions on how to make my own olla using two terra-cotta pots and silicone gel.
It did not look too difficult or expensive, so I decided to give it a try.
There were many different tutorials I found. I decided to use terra cotta pots with silicone gel to seal them.
To make one olla
1. I used 2 six inch terra-cotta pots.
2. I sealed the hole on the bottom of one of the pots using silicone gel and a large round rock and let it dry.
3. I then sealed the two pots together using the same silicone gel. I wore gloves because it made cleanup easier. Using a gloved finger I worked the silicone gel into the crack, forming a good seal.
4. I let that dry for around 24 hours.
5. I filled the homemade olla with water and watched for leaks. (Mine did not have any).
At the garden, I did not dig a very deep hole to put the olla in the ground. I already had my tomato plants in, with my square foot gardening grid over them. So digging a hole with a large shovel was not going to really work, I had to use a small gardening trowel. So my olla was not in the ground as deep as I wanted, (which would make it less efficient). But the way I saw it, it was better than doing nothing.
So far I have had one season to evaluate my “makeshift olla” and I was pleased with the results. I had a few tomato plants that were not near the ollas and the tomatoes suffered from bottom rot. The tomato plants that surrounded the ollas did not have this problem. (Bottom rot, from what I have read, is caused by inconsistent watering and a calcium deficiency. I should note that I also put some egg shells into the olla to add in some nutrients, so that probably helped as well.
I did not rely on the ollas for all the watering needs of my tomato plants. I still watered my tomato plants if they looked like they needed it. (Which as an inexperienced gardener, I did not know what I was doing). I only had 2 ollas and I had 6 tomato plants. Only a few of the plants actually had contact with the ollas, (mostly because I added them after my plants were already in the ground).
Overall I was pleased with the results. The ollas allowed me to have a more consistent watering of my tomato plants. This year I did not add any more ollas, I only have 2, but I did place them in the middle of all my tomato plants. (Which I hope will work even better). I think I might pour some compost around them, to reduce water loss from evaporation, instead of digging a deeper hole. (this might add more nutrients as well, the soil quality is very poor. I am fertilizing this year instead of just relying on the added nutrients of compost. So overall, I expect better yields from my tomato plants. (This means I might have to finally learn how to can, lol).
I am considering making a few more ollas for the melon/squash garden. I have enough room to dig a deeper hole and those plants require a lot of water.It might make life easier,and conserve water and fertilizer. 😉
Do you use a self watering system in your garden?
No Comments