
This post contains affiliate links, which means I may earn some money if you click on one. Don't worry, there is no additional cost to you. Thank you for supporting my blog.
Have you ever thought about making homemade candles? I figured out an easy way to make them. It does not require a double burner, or grating sticks of beeswax by hand. This is a really cool hack I figured out, and it made DIY projects like this a lot more fun.
My natural mother hack – a wax warmer, also called a tart warmer.
Why Beeswax Candles?
Beeswax candles are natural air purifiers. When lit, they emit negative ions, which can neutralize pollutants in the air. (Ions are negatively charged particles). Mold spores, pollen, dander, odors, germs, and dust have a positive charge. (The opposite charges attract, attach, and fall out of the air).
Many store bought candles contain paraffin, a petroleum by-product. Beeswax candles are non-toxic, clean burning, and better for people who have allergies.
You can skip to the recipe or read on to find out how I discovered this trick, and why it is awesome.

The Problem
A few years ago, my daughter and I made some cute beeswax candles to give to away as presents. It was really fun, but just a little messy. All the recipes I found said to use a double burner system. I did not have one so I rigged one up, but I did not have a dedicated pot to use for this purpose, and it was really difficult to clean up.
Most of the recipes I read recommended using beeswax beads. I used them in the past to make deodorant, candles, and stretch mark cream, but then I ran out.
Instead of ordering the beads again, I bought some sticks of beeswax at at local market, at a bargain price. But, then they sat there in a box for a year because I bought a lot of them and did not feel like grating them by hand, and then cleaning the wax off my grater. (In my defense I spend a lot of time preparing meals from scratch, fermenting stuff, growing and preserving a garden, and raising/homeschooling my kids). Another mess is often not very attractive to me.
The Solution
These past few months, I have attempted to used the Marie Kondo method to reduce the amount of clutter I have. When I cleaned out one of my cupboards, I found a box full of beeswax that had collected dust on it. I decided I needed to use it, or give it away. Some say if you have not used something in 2 years it is time to part from it.
Marie Kondo says if something does not bring you joy, to get rid of it.
But the thought of grating all the beeswax by hand did not bring me any joy.
So I researched ways to effectively melt bars of beeswax without shaving it. I found out I could use a tart warmer to melt beeswax and I was intrigued. I had never heard of this type of device. It is also called a wax warmer. Apparently, people use them instead of candles for aromatherapy. A wax warmer heats up wax slowly, and it really seemed like I could use it instead of a double boiler system. (This was exciting).
So instead of buying a double boiler, which was on my list, I ordered a wax warmer.
The Experiment
When the wax warmer arrived, I felt like a kid on Christmas. I thought, it can’t be this easy to make these all natural beeswax candles. I imagined all the cute glass containers we could find at the good will store to turn into candles. Housewarming presents, Christmas gifts, citronella candles, all of a sudden I saw a whole new world of DIY opening up for me.
All the fun without the mess.
I plugged that wax warmer in, put two 1 oz blocks of wax on top and waited. My daughter and I did school activities while the wax melted. I did not have to stir anything, or watch it. When it was melted, I poured the liquid wax into a glass container already prepared with the wick, then added some coconut oil.
That was a mistake, it did not mix very well.
It still made a cute candle, it just wasn’t a homogenous mixture. (It had some layers).
I repeated the experiment a second time, mixing everything in the wax warmer dish before pouring it into the prepared glass jar.
This time it worked like a CHARM.
My easy-peasy all natural homemade beeswax candle experiment worked, it totally worked. I added some Peppermint oil to it, let it cool, and that was IT!!
No mess to clean up, yay!!
The only caveat is you can only make small batches using this method.(Unless you buy a really large wax melter, lol). So if you are making a large batch of candles to distribute at Christmas time, you might want to use a double burner for this project.
But if you just want to make a few for fun, then this technique might work very well for you. 😉
The Recipe
Equipment –
Wax Warmer
Wick
Wick Stickers
4 ounce glass mason jar
Beeswax Sticks (two 1 ounce bars)
Coconut Oil
Essential Oils (optional)
clothespin
Procedure
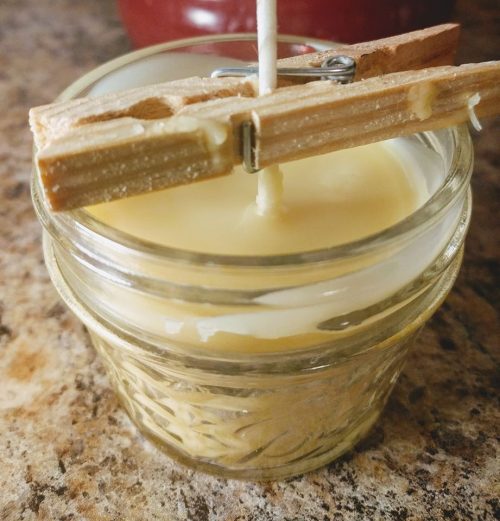
1 – Attach your wick to the bottom of your small jar, using a wick sticker.
2 – Use a clothespin to hold your wick in place, in the middle of the jar.
3 – Plug in the wax warmer and place 2 beeswax sticks onto the warmer.
4 – Wait for the beeswax to melt, it takes a few hours. But you do not have to stir it or watch it, it melts evenly with zero effort.
5 – Once the wax is melted, add the coconut oil and essential oil into the wax warmer bowl. Stir gently, for about 10 minutes, to make sure the coconut oil mixes in evenly. (I used a toothpick to stir gently). Don’t try to pour melted beeswax into the candle jar first and add the oils after. I tried this and it did not work. I even tried to place the mason jar onto the wax warmer to try to “re-melt” it but there was not enough surface area for this.
6. Using oven mitts, carefully pour the wax/oil mixture into your prepared mason jar.
7. Allow it to cool for a few hours before using it. ( I let it cure overnight).
8. Trim the wick and that’s it, you have a beautiful, natural, beeswax candle.
Please let me know if you have any other tips for candle-making in the comments.
1 – Attach your wick to the bottom of your small jar, using a wick sticker. 2 – Use a clothespin to hold your wick in place, in the middle of the jar. 3 – Plug in the wax warmer and place 2 beeswax sticks onto the warmer. 4 – Wait for the beeswax to melt, it takes a few hours. But you do not have to stir it or watch it, it melts evenly with zero effort. 5 – Once the wax is melted, add the coconut oil and essential oil into the wax warmer bowl. Stir gently, for about 10 minutes, to make sure the coconut oil mixes in evenly. (I used a toothpick to stir gently). Don’t try to pour melted beeswax into the candle jar first and add the oils after. I tried this and it did not work. I even tried to place the mason jar onto the wax warmer to try to “re-melt” it but there was not enough surface area for this. 6. Using oven mitts, carefully pour the wax/oil mixture into your prepared mason jar. 7. Allow it to cool for a few hours before using it. ( I let it cure overnight). 8. Trim the wick and that’s it, you have a beautiful, natural, beeswax candle.DIY Beeswax Candles
Ingredients
Instructions
No Comments