This post contains affiliate links, which means I may earn some money if you click on one. Don't worry, there is no additional cost to you. Thank you for supporting my blog.
When I was pregnant I read about the health benefits associated with the regular consumption of fermented food, especially during pregnancy. In South Korea, kimchi is available everywhere, so I ate it a lot. But I wanted some variety and I was terrified by the idea of “doing it myself “, (thoughts of food poisoning or botulism ran through my mind).
Then I thought about the situation logically. I had been consuming kimchi for a few years and I never got sick from it. I had absolutely no idea if the person who made the kimchi sterilized their utensils or made sure the cabbage stayed beneath the brine, (more about that later). If I fermented vegetables in my kitchen, I would have complete control over these variables. So I researched the process of fermentation and learned how to do it safely.
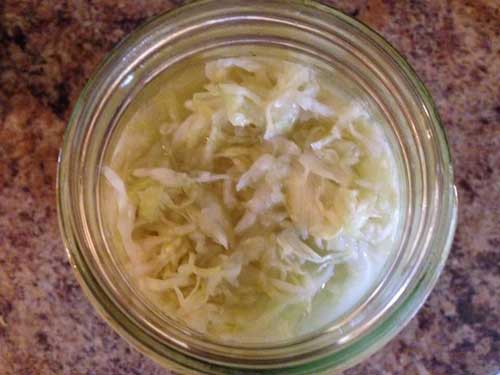
Fast forward to 2015, lacto-fermented sauerkraut has become a staple food in my home. I try to make a batch once a week, and my daughter Lily and I consume it once or twice a day. Lily LOVES it, she has been eating it for over a year now. It tastes good and it is extremely healthy.
Lacto-fermented sauerkraut is NOT the same as the sauerkraut that is preserved with vinegar. Most of the sauerkraut that is sold in the grocery stores has been pasteurized, which means it does not contain any beneficial bacteria. You can find the real deal at the store, (in America), but you have to know what you are looking for. (Bubbies is one company I know that makes and distributes lacto-fermented sauerkraut).
So what are the benefits of lacto-fermented sauerkraut? I’m so glad you asked!
Lacto-fermented sauerkraut:
- strengthens the immune system, (it is loaded with probiotics, the good bacteria).
- stimulates stomach acid production.
- is a type of raw food that is easy to digest.
- is loaded with nutrients and prebiotics.
- is really easy to make.
That is just a brief overview. Every day, more and more scientific studies are showing that the health of our gut bacteria is important for our health, (seventy to eighty percent of our immune system is in our gut).
Here is an article I found recently that shows 2 ounces of home-made sauerkraut can have more probiotics than a bottle of 100 count probiotic capsules.
How to make lacto-fermented sauerkraut
Ingredients
1 Head of Cabbage
2 Tbs. Sea Salt
You will also need …
A large bowl for mixing
A knife for shredding, (or a food processor)
A large jar
Some sort of weight, (I use a smaller glass jar filled with water that fits perfectly inside the larger jar).
Filtered water, (chlorine is NOT good for the bacteria). I use a Zero Water Filter.
1. Sterilize your tools; you want to kill undesirable bacteria or yeast.
2. Peel off a few leaves from the outside of the cabbage and set aside.
3. Shred the cabbage. You can do this with a large knife, or you can use a food processor.
4. In a large bowl, mix in the 2 tablespoons of sea salt. Sea salt is superior to table salt because it has a good balance of minerals in it, which are good for the bacteria, (and good for us too). The next step is important, don’t skip it! You need to mix in the salt well and squeeze the shredded cabbage using your hands. You need to do this for 5-10 minutes, until you have an adequate amount of brine. (When you shred the cabbage into small pieces, the brine forms more quickly, at least that has been my experience).
5. Pack the shredded cabbage tightly into a jar. Push down on it HARD so the brine rises up to the top. (Ideally you want an inch of brine to cover the shredded cabbage).
6. Place the cabbage leaves on top of the shredded pieces of cabbage. If there is not at least an inch of brine, add a little bit of your filtered water. The brine is essential; any cabbage that stays under the brine will be O.K. to eat. The fermentation process makes lactic acid, which inhibits the growth of undesirable bacteria.
7. Place your weight on top on top of the cabbage leaves and cover your glass jar. Some people use mason jars and simply place a cheese cloth over the top to keep the flies out. I use a pickling jar which allows air to escape. DO NOT screw a lid on tight, there will be gas produced during the fermentation process and the pressure can build up inside and shatter your glass container if there is no release.
8. Set the jar in a dark cupboard and ferment for 3-7 days. I typically let my sauerkraut ferment for a week. This is approximately how long a batch of sauerkraut will last for me and Lily. I would like to eventually let my ferments go a little longer, but it is something I am building up to.
So far I have not had any problems with mold growing on the surface of the brine, (with the sauerkraut at least, it did happen once with the dill pickles – bleh). This is called a “bloom”, and it is supposedly O.K. to just scrape it off the top, because everything under the brine is protected. (I am a visual person, so I didn’t eat the pickles with the “bloom” on top, even though the pickles were all under the brine).
The above recipe is the basic sauerkraut recipe. You can shred other vegetables and add them in for variety. I like to add some red cabbage to it because it is even more nutrient dense than green cabbage, (it has more iron in it and 10 times the amount of Vitamin A.) It also makes it the kraut turn pink which looks really pretty on a plate. (The color of the red cabbage changes from purple to pink during the fermentation process because of the presence of the lactic acid. Red cabbage juice is a natural pH indicator).
I find it so much easier to eat healthy when I have some homemade sauerkraut in the fridge. It is an easy way to ensure my family is getting some veggies with each meal. Once it is prepared, I don’t have to shred, slice, or cook, I just scoop it out of the jar and voila, an instant side dish. (Did I mention that sauerkraut is also loaded with Vitamin C? It’s sort of a double whammy for the immune system).
So that’s the basic sauerkraut recipe. Have you tried making sauerkraut? Have you noticed any improvements in health after regular consumption?
*Update – Now I use fermenting lids called Kraut Kaps. The caps featured in this post were the only caps I could find when I lived in South Korea. Kraut kaps are available on Amazon for purchase. (link)
Sterilize your tools; you want to kill undesirable bacteria or yeast. Peel off a few leaves from the outside of the cabbage and set aside. Shred the cabbage. You can do this with a large knife, or you can use a food processor. In a large bowl, mix in the 2 tablespoons of sea salt. Sea salt is superior to table salt because it has a good balance of minerals in it, which are good for the bacteria, (and good for us too). The next step is important, don't skip it! You need to mix in the salt well and squeeze the shredded cabbage using your hands. You need to do this for 5-10 minutes, until you have an adequate amount of brine. (When you shred the cabbage into small pieces, the brine forms more quickly, at least that has been my experience). Pack the shredded cabbage tightly into a jar. Push down on it HARD so the brine rises up to the top. (Ideally you want an inch of brine to cover the shredded cabbage). Place the cabbage leaves on top of the shredded pieces of cabbage. If there is not at least an inch of brine, add a little bit of your filtered water. The brine is essential; any cabbage that stays under the brine will be O.K. to eat. The fermentation process makes lactic acid, which inhibits the growth of undesirable bacteria. Place your weight on top on top of the cabbage leaves and cover your glass jar. Some people use mason jars and simply place a cheese cloth over the top to keep the flies out. I use a pickling jar which allows air to escape. DO NOT screw a lid on tight, there will be gas produced during the fermentation process and the pressure can build up inside and shatter your glass container if there is no release. Set the jar in a dark cupboard and ferment for 3-7 days. I typically let my sauerkraut ferment for a week. This is approximately how long a batch of sauerkraut will last for me and Lily. I would like to eventually let my ferments go a little longer, but it is something I am building up to.Traditional Sauerkraut
Ingredients
Instructions

No Comments